DIY Basement Waterproofing System: Ultimate Solution Worth It
Basement moisture is a common problem for homeowners, leading to musty odors, mold growth, and potential structural damage. The DIY Basement Waterproofing System offers a comprehensive, all-in-one solution designed to empower homeowners to tackle these issues head-on without the prohibitive costs of professional services. This complete kit includes everything from baseboard channel gutter panels and a robust sump pump to essential installation accessories like floor adhesive and a caulk gun, making it an appealing option for those looking for an effective and budget-friendly approach to protecting their home.
Quick Summary: DIY Basement Waterproofing System
Rating: Not yet rated (0.0/5.0)
Price: $2,014.95
Key Pros:
- Comprehensive Kit: Includes all necessary components for a full 100 ft basement waterproofing installation.
- Cost-Effective DIY: Significantly reduces expenses compared to professional waterproofing services.
- Proactive Protection: Effectively manages water intrusion, preventing mold, mildew, and structural damage.
Key Cons:
- Labor Intensive: Requires significant time and effort for installation, demanding a certain level of DIY skill.
- No User Reviews: Lacks customer feedback to gauge real-world performance and reliability.
Table of Contents
DIY Basement Waterproofing System Overview
The concept of a DIY Basement Waterproofing System is born out of necessity for many homeowners facing the persistent challenge of water intrusion. Basements are inherently susceptible to moisture problems due to their below-grade construction, making them a prime target for hydrostatic pressure, leaky cracks, and general dampness. This particular system aims to provide a robust internal drainage solution, effectively managing water that enters the basement before it can cause significant damage or create an unhealthy living environment.
At its core, this system is designed to intercept water at the wall-floor joint and direct it to a sump pump, which then expels it safely away from the foundation. This approach is a widely recognized and effective method for interior basement waterproofing. Instead of attempting to stop water from entering through the walls (an often difficult and costly exterior excavation process), it focuses on controlling and removing water once it has breached the foundation.
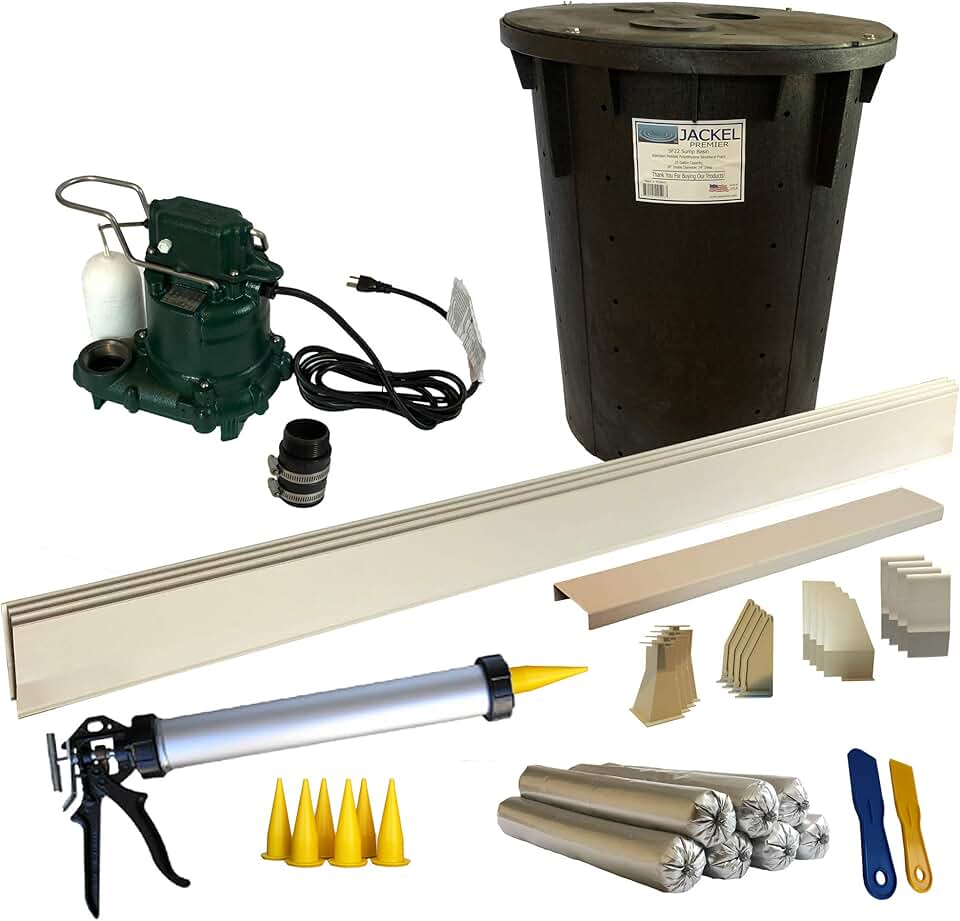
The kit’s comprehensive nature is one of its most compelling aspects. It’s not just a few pieces of drainage channel; it’s a full 100-foot setup, complete with a sump pump and basin, all the necessary adhesive, a caulk gun, and various accessories. This means that a homeowner, once they acquire the system, should theoretically have all the specialized components needed to complete the project, reducing the need for multiple trips to hardware stores or complex component sourcing.
Understanding the components involved is key to appreciating the value of this DIY Basement Waterproofing System. The baseboard channel gutter panels are designed to sit along the perimeter of the basement floor, collecting water that seeps down the walls or through the wall-floor joint. These channels are strategically engineered to create a path of least resistance for water, guiding it towards the sump basin.
The inclusion of a sump pump and basin is crucial, as this is the heart of any effective interior waterproofing system. The sump pump’s role is to automatically activate when water levels in the basin reach a certain point, pumping the collected water out of the basement and away from the foundation. This prevents water from accumulating and causing flooding or sustained dampness, which can lead to mold and structural issues.
For homeowners, the appeal of a DIY system like this lies in the potential for significant cost savings. Professional basement waterproofing can be an extremely expensive undertaking, often costing thousands, if not tens of thousands, of dollars. By providing a comprehensive kit, this product empowers individuals with moderate DIY skills to achieve a similar level of protection at a fraction of the cost, making basement waterproofing more accessible to a wider range of budgets.
Furthermore, taking on a DIY project like this can provide a deep sense of accomplishment and a better understanding of one’s own home. It allows for direct control over the installation process, ensuring that each step is performed to the homeowner’s satisfaction. While it demands time and effort, the long-term benefits of a dry, healthy basement often far outweigh the initial investment of labor.
The system is particularly well-suited for basements experiencing common issues such as dampness, efflorescence on walls, or minor water seepage during heavy rains. It creates an internal drainage path that effectively manages these problems, diverting water before it can cause widespread damage. However, it’s important to distinguish this system from solutions for severe structural issues or major foundation cracks, which might require more extensive, professional intervention.
In summary, this DIY Basement Waterproofing System presents itself as an all-encompassing, cost-effective, and proactive solution for managing basement moisture. It provides the necessary components for a complete internal drainage system, offering homeowners the tools to protect their property and improve their indoor environment. Its design prioritizes ease of use for the DIY enthusiast while promising the robust functionality typically associated with professional-grade waterproofing systems.
DIY Basement Waterproofing System Key Features & Specs
Understanding the specific components and specifications of this DIY Basement Waterproofing System is crucial for evaluating its effectiveness and suitability for your home. This kit is designed to be a complete package, meaning it includes virtually everything you need for a 100-foot perimeter installation, from the drainage system itself to the tools for sealing and securing it.
Baseboard Channel Gutter Panels
The core of the drainage system consists of baseboard channel gutter panels. These panels are typically made from durable, rigid PVC or a similar high-density plastic, engineered to withstand constant exposure to moisture without degrading. They are designed to be installed along the interior perimeter of your basement where the floor meets the wall.
The design of these channels is critical. They usually feature an open top and a sloped or channeled interior to efficiently capture and direct water. Water seeping from wall cracks, through porous foundation walls, or rising from the floor-wall joint is guided into these channels. Their low-profile design ensures they don’t protrude excessively into the living space, allowing for future finishing of the basement if desired.
With 100 feet of coverage, this system is capable of addressing a significant portion of a typical basement. For larger basements, multiple kits or supplementary channels might be needed, but for many standard-sized homes, 100 feet provides ample coverage for common problem areas.
Sump Pump & Basin
The sump pump and basin form the vital expulsion mechanism of the entire system. The basin, often a robust plastic liner, is installed in a dug-out pit in the lowest part of the basement floor. It collects all the water channeled from the baseboard panels, acting as a reservoir for the sump pump.
The sump pump itself is an electro-mechanical device designed for automatic operation. While specific pump specifications (like horsepower or GPH – gallons per hour) are not explicitly listed in the product title, a complete system typically includes a reliable, submersible pump. These pumps are equipped with a float switch that activates the pump automatically when water levels in the basin reach a predetermined height, ensuring continuous water removal without manual intervention.
A good sump pump for a residential basement can typically move thousands of gallons of water per hour, providing peace of mind during heavy rainfall or snowmelt. The quality and reliability of the included sump pump are paramount, as it is the single point of failure for the entire system’s ability to remove water.
Floor Adhesive and Caulk Gun
The inclusion of floor adhesive and a caulk gun highlights the all-inclusive nature of this DIY Basement Waterproofing System. The adhesive is essential for securely attaching the baseboard channel gutter panels to the basement floor, creating a tight seal and preventing water from seeping underneath the channels.
The adhesive must be specifically formulated for concrete and basement environments, capable of withstanding moisture and temperature fluctuations. A high-quality adhesive ensures the long-term stability and effectiveness of the drainage system. The caulk gun, a standard tool, is provided to facilitate easy and precise application of the adhesive or any necessary sealants around the channels and other components, ensuring a professional-looking and watertight finish.
All Accessories
Beyond the main components, the phrase “all accessories” is a strong indicator of the kit’s completeness. While not detailed, this would typically include items such as:
- Connectors and Couplings: For joining multiple sections of baseboard channel and ensuring a continuous drainage path.
- Corner Pieces: Specialized sections to ensure seamless transitions around interior and exterior corners of the basement.
- Outlet Pipes: Necessary for connecting the sump pump to an exterior discharge line, directing water away from the foundation.
- Sealants and Mortar: Additional materials for patching minor cracks, sealing joints, and ensuring a watertight installation.
- Fasteners: Any clips, screws, or anchors required to secure components.
- Instruction Manuals: Crucial for guiding the DIY installer through each step of the process.
The provision of these accessories minimizes the guesswork and additional purchases often associated with DIY projects. It streamlines the installation process, allowing homeowners to focus on the task at hand rather than hunting for obscure parts. The overall design emphasizes a robust, internal drainage approach, effectively managing water intrusion and safeguarding the basement environment against moisture-related damage. The 100-foot coverage ensures that most average-sized basements can be comprehensively protected with this single kit.
Pros & Cons of the System
Every product, especially one as significant as a DIY Basement Waterproofing System, comes with its own set of advantages and disadvantages. A thorough evaluation of these points is essential for any homeowner considering this solution for their property. While the promise of a dry basement is enticing, it’s important to weigh the practicalities and potential challenges.
Pros of the DIY Basement Waterproofing System
1. Comprehensive All-in-One Solution
One of the most significant advantages of this system is its completeness. The kit includes baseboard channel gutter panels, a sump pump with a basin, floor adhesive, a caulk gun, and all necessary accessories for a 100-foot installation. This eliminates the guesswork and multiple trips to the hardware store, ensuring that you have every specialized component needed to complete the project from start to finish. This streamlined approach makes the waterproofing process more manageable for DIY enthusiasts.
2. Significant Cost Savings Over Professional Services
Professional basement waterproofing can be an extraordinarily expensive endeavor, often ranging from several thousand to tens of thousands of dollars. By opting for a DIY Basement Waterproofing System, homeowners can achieve similar protective results at a fraction of the cost. The primary expense becomes the kit itself, with labor being contributed by the homeowner, leading to substantial savings that can be allocated to other home improvement projects.
3. Effective Interior Drainage Method
The system employs an interior drainage method, which is a proven and effective way to manage basement water intrusion. Rather than trying to stop water from entering (which can be difficult and costly to achieve from the exterior), this system intercepts water that has already entered or is about to enter the basement and directs it safely to a sump pump. This proactive approach prevents water from accumulating on the floor, protecting belongings and the structural integrity of the home.
4. Empowerment and Control for Homeowners
Undertaking a DIY project like this gives homeowners a profound sense of empowerment and control. They gain a direct understanding of their home’s foundation and water management system. This hands-on experience can be invaluable for future maintenance or troubleshooting, fostering a deeper connection with and knowledge of their property. It also ensures the work is done to their personal standards.
5. Long-Term Protection Against Moisture-Related Issues
A properly installed DIY Basement Waterproofing System provides lasting protection against common basement problems such as dampness, musty odors, mold and mildew growth, and efflorescence. By keeping the basement dry, the system contributes to a healthier indoor air quality and preserves the structural components of the house, potentially increasing property value and preventing costly repairs down the line.
Cons of the DIY Basement Waterproofing System
1. Labor-Intensive Installation Process
While the system is designed for DIY, it is by no means a quick or effortless task. Installing a 100-foot perimeter drainage system, including digging a sump pit, laying channels, and connecting the pump, requires significant physical labor, time, and dedication. Homeowners must be prepared for several days, possibly even a week or more, of focused work, depending on their skill level and the condition of their basement.
2. Requires Moderate to Advanced DIY Skills
Though marketed as DIY, the installation of a comprehensive basement waterproofing system demands more than basic handyman skills. It involves accurate measurements, cutting and fitting drainage channels, working with adhesives, potentially some concrete work for the sump pit, and electrical connections for the sump pump. Those uncomfortable with such tasks might find the project overwhelming or may make mistakes that compromise the system’s effectiveness.
3. Lack of Professional Warranty and Expertise
One of the primary benefits of hiring a professional waterproofing company is the peace of mind that comes with their experience and warranty. A DIY installation, while saving money, means the homeowner is solely responsible for the quality of the work and any issues that arise. There’s no professional warranty on the installation itself, and the homeowner lacks access to the specialized diagnostic tools and expertise that professionals bring to complex water problems.
4. Not Suitable for All Types of Water Intrusion
This internal drainage system is highly effective for managing hydrostatic pressure and general wall seepage. However, it may not be the ideal solution for all basement water problems. For instance, severe structural cracks in the foundation, significant foundation shifting, or exterior issues like poor grading that lead to massive water ingress might require more extensive, professional exterior waterproofing or structural repairs that this DIY kit cannot address.
5. Initial Investment and No User Reviews
Despite being more affordable than professional services, the initial outlay of over $2,000 for the kit is still a significant investment for many homeowners. Furthermore, the absence of customer reviews or ratings for this specific product (as indicated by the 0.0 rating and 0 reviews) means potential buyers lack real-world feedback on its performance, durability, and ease of installation from other users. This absence of social proof can make the decision to purchase more challenging.
Who Should Buy the DIY Basement Waterproofing System?
Deciding whether the DIY Basement Waterproofing System is the right investment for your home involves a careful assessment of your specific situation, skill set, and budget. This system is not a one-size-fits-all solution, but it does cater to a particular demographic of homeowners looking for an effective and economical way to combat basement moisture.
The Budget-Conscious Homeowner
If you’re experiencing basement dampness or minor leaks but find the quotes from professional waterproofing companies to be beyond your financial reach, this DIY system presents a compelling alternative. The upfront cost of the kit is significantly lower than professional installation, making it an attractive option for those who need a solution without breaking the bank. You’re trading professional labor costs for your own time and effort, which can be a smart financial move for many.
The Handy and Motivated DIY Enthusiast
This system is ideal for individuals who are comfortable with home improvement projects, possess a good understanding of basic construction principles, and are not afraid of a physically demanding task. If you enjoy learning new skills, have a collection of tools, and are meticulous in your work, you likely have the aptitude to successfully install this system. Your motivation to save money and improve your home will be a key driver in seeing the project through.
Homeowners with Moderate Basement Moisture Issues
The DIY Basement Waterproofing System is particularly well-suited for basements that exhibit common signs of moisture, such as: a persistent musty smell, efflorescence (white, powdery deposits) on concrete walls, occasional puddles after heavy rain, or damp spots along the base of the walls. It is designed to manage water that seeps through the foundation or at the wall-floor joint, effectively diverting it to the sump pump before it can cause damage. This system excels at proactive water management for these types of problems.
It’s important to note that while this system is robust, it’s generally best for moderate issues rather than severe structural problems. If your basement has significant, actively gushing leaks from large cracks, major foundation shifts, or chronic flooding, it might be prudent to consult with a structural engineer or a professional waterproofing company first to diagnose the underlying cause and determine if this DIY solution is adequate.
Those Seeking Preventative Measures
Even if your basement isn’t currently experiencing severe water problems, but you live in an area prone to heavy rainfall, have an older home, or are planning to finish your basement, installing a DIY Basement Waterproofing System can be an excellent preventative measure. Proactively managing potential water intrusion can save you countless headaches and expenses down the road, protecting your investment and ensuring a healthy living space from the outset.
Consider your long-term plans for your basement. If you intend to convert it into a habitable living area, a dry foundation is non-negotiable. Installing this system yourself can be a foundational step in creating a comfortable, mold-free environment suitable for bedrooms, family rooms, or home offices. It provides the essential barrier against moisture that is crucial for finishing a basement properly.
Ultimately, the ideal buyer for this DIY Basement Waterproofing System is a homeowner who is proactive, budget-conscious, and possesses a solid level of DIY confidence. They are willing to invest their own time and effort to secure their home against water damage, understanding that the long-term benefits of a dry basement far outweigh the temporary challenges of installation. Before committing, always assess the severity of your water issues and your personal capacity to undertake such a project.
FAQ about DIY Basement Waterproofing System
Many questions arise when considering a significant home improvement project like installing a DIY Basement Waterproofing System. Here, we address some of the most common inquiries to help you make an informed decision and prepare for the installation process.
Q1: How difficult is the installation process for a DIY Basement Waterproofing System?
A1: The installation difficulty level is moderate to advanced. While the kit provides all necessary components and presumably instructions, it requires a significant time commitment and a good understanding of basic carpentry and plumbing. Tasks include precise measuring and cutting of drainage channels, digging a sump pit in concrete, connecting discharge lines, and potentially some minor electrical work for the sump pump. It is physically demanding and best suited for experienced DIYers who are comfortable with such tasks. If you’re unsure, watching tutorial videos or consulting with a knowledgeable friend before starting can be beneficial.
Q2: What additional tools will I need beyond what is included in the kit?
A2: While the kit is comprehensive, you will likely need several standard household and power tools. These typically include a hammer drill with a masonry bit for concrete, a circular saw or miter saw for cutting drainage channels (if they are rigid plastic), a shovel and pickaxe for digging the sump pit, a bucket, a level, measuring tape, safety glasses, gloves, and a utility knife. You may also need a wet/dry shop vacuum for cleanup and possibly some plumbing tools for connecting the sump pump’s discharge line to an existing drain or exterior outlet.
Q3: How does this DIY system compare to professional basement waterproofing services?
A3: The primary difference lies in cost, labor, and warranty. A DIY system offers substantial cost savings because you provide the labor. Professional services come with a higher price tag but include expert installation, often a robust warranty on the work, and specialized equipment. In terms of effectiveness, both can be highly effective for interior drainage, but professionals can also address more complex exterior issues or structural repairs that a DIY kit cannot. For a comprehensive overview of waterproofing methods, you can refer to resources like EPA’s information on moisture control.
Q4: What types of water issues is this DIY Basement Waterproofing System designed to solve?
A4: This system is primarily designed to address water entering your basement through hydrostatic pressure (water pushing up through the floor or in through the wall-floor joint), seepage through porous concrete walls, and minor wall cracks. It effectively intercepts this water at the perimeter and directs it to the sump pump for removal. It’s an excellent solution for damp basements, musty odors, efflorescence, and occasional puddles. It may not be sufficient for large, actively flowing leaks from major structural cracks or severe exterior drainage problems.
Q5: How long can I expect the DIY Basement Waterproofing System to last?
A5: With proper installation and regular maintenance, the drainage channels themselves (typically made of durable PVC) can last for many decades. The sump pump, being a mechanical device, has a shorter lifespan, usually 5-10 years, depending on usage frequency and quality. It’s crucial to periodically check the sump pump for proper operation, especially before and during heavy rain seasons. Replacing a sump pump is a relatively straightforward task compared to installing the entire drainage system.
Q6: Is the included sump pump reliable, and what happens during a power outage?
A6: While specific details about the included sump pump are not provided, a complete system typically comes with a standard residential submersible sump pump designed for reliable operation. However, during a power outage, an electric sump pump will cease to function. For continuous protection, especially in areas prone to frequent power interruptions or severe weather, installing a battery backup sump pump or a water-powered backup sump pump in conjunction with the primary pump is highly recommended. This ensures your basement remains dry even when the power is out.
Q7: Can I install this system if my basement walls are already finished?
A7: Installing an interior drainage system like this typically requires access to the bare concrete walls and floor perimeter. If your basement walls are already finished (e.g., with drywall or paneling), you would likely need to remove a portion of the finished wall and possibly a section of the flooring along the perimeter to install the baseboard channels and prepare the sump pit. This adds significant complexity and cost to the project, as it involves demolition and then re-finishing work. It’s generally easier and more cost-effective to install such a system in an unfinished basement.
Q8: What kind of maintenance does a DIY Basement Waterproofing System require?
A8: Regular maintenance is key to the system’s longevity and effectiveness. You should periodically check the sump pump basin for debris and clean it as needed. Test the sump pump every few months by pouring a bucket of water into the basin to ensure the float switch activates the pump. Inspect the discharge line to ensure it’s clear and directing water away from your foundation. Also, keep the baseboard channels free from obstructions. For general information on maintaining your home’s foundation, you might find resources from organizations like National Association of Waterproofing and Structural Repair Contractors helpful.
Final Verdict
The DIY Basement Waterproofing System presents a compelling and practical solution for homeowners grappling with basement moisture issues. It stands out as an all-inclusive kit, providing a comprehensive set of components for a 100-foot perimeter installation, including essential drainage channels, a reliable sump pump and basin, and all the necessary adhesives and accessories. This completeness significantly reduces the hassle of sourcing individual parts, making the project more accessible for the motivated DIYer.
The most attractive aspect of this system is undoubtedly the substantial cost savings it offers compared to hiring professional waterproofing services. For homeowners with moderate moisture problems and a willingness to invest their own time and effort, this kit provides an economically sound path to a dry and healthy basement. It empowers individuals to take control of their home’s integrity, fostering a deeper understanding of their property’s needs.
However, it’s crucial to approach this project with realistic expectations regarding the labor and skill required. This is not a weekend project for the faint of heart; it demands physical exertion, meticulous attention to detail, and a moderate to advanced level of DIY proficiency. The absence of user reviews for this specific product means potential buyers must rely on the product description and their own assessment of their capabilities, as well as general knowledge of interior drainage systems.
In conclusion, if you are a handy, budget-conscious homeowner experiencing typical basement dampness, seepage, or minor leaks, and are prepared for a significant but rewarding undertaking, the DIY Basement Waterproofing System could be an excellent investment. It offers a robust, proven method for interior water management, providing long-term protection against the detrimental effects of moisture. While it requires dedication, the ultimate reward of a dry, healthy, and potentially more valuable home makes this ultimate solution truly worth it.